Remote server setup for VNC
In order to run VCS, a rendering environment is required on the machine on which it will be run. There are three ways to achieve a rendering environment:
- One way is to build VTK with OSMesa support. Accordingly, VCS will perform software rendering (on the CPU) instead of using the screen and any GPU driving it.
- Another approach is to require that the user who will run VCS is logged in to the machine and that this user is running a valid display. In this case, VCS will use the user's valid display environment (and the GPU) to perform its rendering.
- The third approach is to use a virtual display, such as that which is provided by a virtual network sharing (VNC) system. While the first approach requires build-time modification to VCS and the second approach may not be possible with remote servers, the third approach provides the flexibility of having a working rendering environment available for VCS installations.
The following page lists steps required to setup a remote environment using VirtualGL and TurboVNC. This is a VCS specific version of the VirtualGL documentation that goes through each step is detail.
At the highest level, the procedure for setting up VCS to render using VirtualGL and TurboVNC is as follows:
- Install, configure and test VirtualGL
- Install TurboVNC
- Use VirtualGL and TurboVNC to run VCS
Below is a summary of the instructions for installing, configuring, and testing VirtualGL. The original, complete instructions are located on the VirtualGL documentation pages.
NOTE 1 The following steps need root access to the remote server.
NOTE 2 It is recommended to install 64 bit binaries.
Download the appropriate VirtualGL binary package(s) for your system from the Files area of the VirtualGL SourceForge project page.
- For Debian systems
wget https://sourceforge.net/projects/virtualgl/files/2.5.2/virtualgl_2.5.2_amd64.deb/download -O virtualgl_2.5.2_amd64.deb- For RPM based systems
wget https://sourceforge.net/projects/virtualgl/files/2.5.2/VirtualGL-debuginfo-2.5.2.x86_64.rpm/download -O VirtualGL-debuginfo-2.5.2.x86_64.rpmInstall the package using the system package manager as root.
For Debian systems
sudo dpkg -i virtualgl*.debFor RM based systems
sudo rpm -e VirtualGL --allmatches
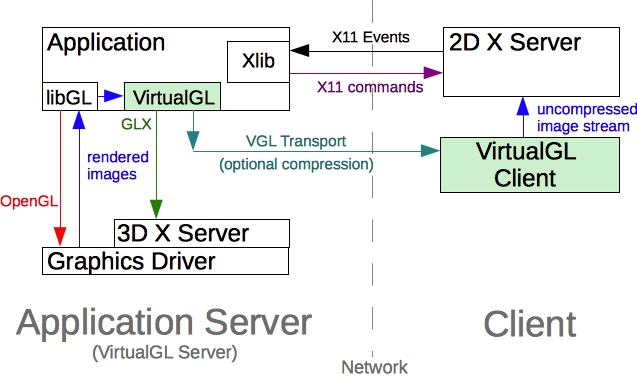
sudo yum install VirtualGL*.rpmVirtualGL requires access to a GPU on the remote server so that it can create off-screen pixel buffers (Pbuffers) and redirect the 3D rendering from X windows into these Pbuffers. Accessing a GPU on Linux and UNIX systems requires going through an X server. This is depicted in the figure below.
The following sections explain how to configure the VirtualGL server such that selected users can run VirtualGL via the X server.
Enter TTY (hit Ctrl-Alt-F1)
sudo /etc/init.d/lightdm stopssh)
sudo /opt/VirtualGL/bin/vglserver_configYou will be asked three questions during this configuration. You can arrange things how you like, but for most secure configuration, you will want to reply in the affirmative to each question.
"Restrict 3D X server access to vglusers group?"  Yes.
"Restrict framebuffer device access to vglusers group?"  Yes.
"Disable XTEST extension?"  Yes.
sudo useradd vcsusersudo usermod -a -G vglusers vcsuser
sudo usermod -a -G vglusers rootsudo /etc/init.d/lightdm startTo verify that the remote server is ready to run VirtualGL, log out of the server, log back into the server using SSH (from a different machine) and execute the following commands in the SSH session.
- If you restricted 3D X server access to vglusers
xauth merge /etc/opt/VirtualGL/vgl_xauth_key
xdpyinfo -display :0
/opt/VirtualGL/bin/glxinfo -display :0 -c- If you did not restrict 3D X server access
xdpyinfo -display :0
/opt/VirtualGL/bin/glxinfo -display :0 -c
Both commands should output a list of visuals and should complete without
errors. If you chose to disable XTEST extension, then check the output of
xdpyinfo to verity that XTEST does not show up in the list of extensions.
You should also examine the output of glxinfo to ensure that at least one of
the visuals is 24-bit or 32-bit TrueColor and has Pbuffer support (the latter is
indicated by a "P" in the last column.)
Example:
    visual  x   bf lv rg d st  colorbuffer  ax dp st accumbuffer  ms  cav  drw
  id dep cl sp  sz l  ci b ro  r  g  b  a F bf th cl  r  g  b  a ns b eat  typ
------------------------------------------------------------------------------
0x151 24 tc  0  32  0 r  y  .  8  8  8  0 .  4 24  8 16 16 16 16  0 0 None PXW
If none of the visuals has Pbuffer support, then this is most likely because there is no 3D acceleration, which is most likely because the correct 3D drivers are not installed (or are misconfigured). Lack of 3D acceleration is also typically indicated by the word “Mesa” in the client GLX vendor string and/or the OpenGL vendor string, and the words “Software Rasterizer” in the OpenGL renderer string.
Here is a summary of how to install TurboVNC on Linux systems. Detailed instructions can be found on the TurboVNC documentation pages.
-
Download the appropriate binary package for your system from the Files area of the TurboVNC SourceForge project page.
- For Debian systems
wget https://sourceforge.net/projects/turbovnc/files/2.1.1/turbovnc_2.1.1_amd64.deb/download -O turbovnc_2.1.1_amd64.deb
- For RPM based systems
wget https://sourceforge.net/projects/turbovnc/files/2.1.1/turbovnc-2.1.1.x86_64.rpm/download -O turbovnc-2.1.1.x86_64.rpm
-
Install TurboVNC
- For Debian systems
dpkg -i turbovnc*.deb- For RPM based systems
rpm -U turbovnc*.rpm
If VirtualGL and TurboVNC have been installed and set up correctly, you can use them to provide a rendering environment for VCS. You must be logged in as the user you placed in the vglusers group on the remote server.
Start a TurboVNC session.
/opt/TurboVNC/bin/vncserverMake a note of the X display number that the TurboVNC session is occupying. For instance:
Desktop 'TurboVNC: my_server:1 (my_user)' started on display my_server:1You could add the -noauth argument to vncserver to allow future users to
forego authentication while connecting to the session.
/opt/TurboVNC/bin/vncserver -noauthYou could also provide a display size.
/opt/TurboVNC/bin/vncserver -geometry 1440x900as well as a custom script to be run when starting the X server.
/opt/TurboVNC/bin/vncserver -geometry 1440x900 -xstartup ~/.vnc/xstartupFor example, starting an XFCE desktop environment, the xstartup contains:
  #!/bin/sh
  unset SESSION_MANAGER
  unset DBUS_SESSION_BUS_ADDRESS
  startxfce4 &

  [ -x /etc/vnc/xstartup ] && exec /etc/vnc/xstartup
[ -r $HOME/.Xresources ] && xrdb $HOME/.XresourcesOne the TurboVNC session is setup and connected to, we can run VCS applications using vglrun.
vglrun app